
How to Repair Asphalt Driveway Cracks Step by Step
Table of Contents
Tools Needed for Driveway Crack Repair
How to Assess Asphalt Driveway Cracks Before You Start
Hairline Cracks vs. Alligator Cracking vs. Potholes
Step-by-Step: Cleaning and Preparing the Crack
Removing Debris and Vegetation
Asphalt Crack Filler Types: Which One to Choose
What's Actually Inside the Tube
Matching Filler to Your Climate
Caulking Gun vs. Pourable Filler
Reading the Label Before You Buy
Applying the Filler and Smoothing the Repair
Curing Time and Weather Conditions That Affect Your Repair
Why Temperature Controls the Bond
The Freeze-Thaw Problem
How to Tell If Your Repair Failed Because of Weather
How to Fix a Weather-Related Failure
When to Call a Professional for Asphalt Repair
Troubleshooting Failed Repairs and Preventing Future Asphalt Driveway Cracks
Frequently Asked Questions
Last Updated: September 25, 2026
Tools Needed for Driveway Crack Repair
Repairing asphalt driveway cracks yourself starts with the right tools, and most cost less than a single service call. At Advanced Paving and Sealcoating, Inc., we've spent over 20 years fixing pavement across Central Illinois.
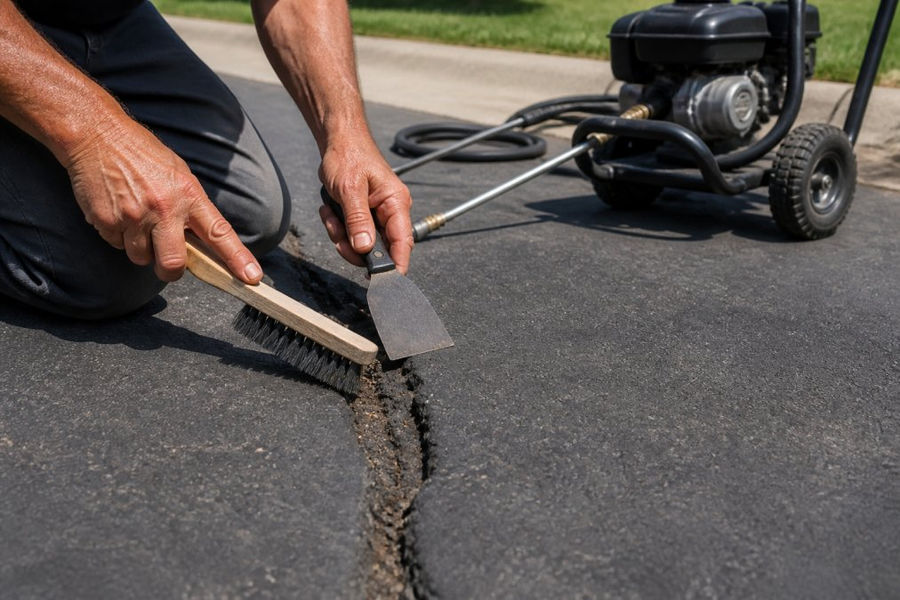
Gather these before you touch the driveway:
Wire brush for scrubbing loose grit from crack walls
Putty knife or chisel for scraping out packed debris
Caulking gun if you're using tube filler
Trowel for smoothing pourable filler
Pressure washer or garden hose for a final rinse
Backer rod for deep cracks
Safety glasses and gloves
How to Assess Asphalt Driveway Cracks Before You Start
Assessment is the step most homeowners skip, and it's why so many asphalt driveway cracks come back within a season. Match your method to the damage before buying filler.
Hairline Cracks vs. Alligator Cracking vs. Potholes
Hairline cracks are thin, shallow splits under a quarter inch wide, the easiest DIY fix.
Step-by-Step: Cleaning and Preparing the Crack
Surface preparation decides whether your repair lasts one winter or five. Filler bonds to clean, dry asphalt and fails on dirty asphalt every time.
seejanedrill
Follow these steps:
Remove loose debris with a wire brush or chisel. Get every crumb out.
Pull vegetation by hand or with a weeding tool. Roots will push the repair apart.
Square up the edges of larger cracks with a chisel so the filler has vertical walls to grip.
Rinse the crack with a pressure washer or hose.
Let it dry completely. Damp asphalt kills adhesion.
Removing Debris and Vegetation
Vegetation removal is the step people rush and the one that causes the most callbacks. Weed roots spread under the surface and push your repair up within months.
Asphalt Crack Filler Types: Which One to Choose
Filler selection is where most DIY repairs are won or lost: the wrong product in the right crack still fails, and the right product in the wrong season fails too. Three categories sit on most shelves.
Filler Type | Best For | Application | Cure Time |
Rubberized tube filler (asphalt-emulsion based) | Hairline to 1/2-inch cracks | Caulking gun | 24-48 hours |
Pourable asphalt-emulsion | Cracks over 1/2 inch, long runs | Pour and trowel | 24-72 hours |
Cold-patch compound | Potholes, deep failures | Tamp and compact | Immediate traffic |
What's Actually Inside the Tube
Rubberized tube filler is asphalt emulsion blended with recycled crumb rubber and a carrier. The rubber provides flexibility: asphalt expands and contracts, and a rigid filler cracks away from the walls the first time the pavement moves. The carrier cures, the filler shrinks, and that's why you overfill.
Matching Filler to Your Climate
This part most guides skip, and it decides whether your repair survives its first winter.
Caulking Gun vs. Pourable Filler
A caulking gun gives you control on narrow, winding cracks: follow the crack's path without overfilling, and stop and restart without wasting product.
Reading the Label Before You Buy
Look for three things: the temperature application range, the crack width it's rated for, and whether it's a sealant or a patch. A product rated for 40°F and up won't bond at 35°F, one rated to 1/2 inch will sag in a 1-inch crack, and a patch compound used as a sealant will crack at the edges.
Pro Tip Warm the filler tube in a bucket of hot water for ten minutes before loading your caulking gun. It flows easier and fills tight cracks without air pockets. Don't microwave it or leave it in direct sun, which can overheat the product and separate the emulsion.
Watch Out Never mix filler types in the same crack. A cold-patch base topped with rubberized sealant can trap moisture between the two layers and accelerate the failure you were trying to prevent.
Applying the Filler and Smoothing the Repair
Application is quick once prep is done, but technique matters more than speed. Fill from the bottom up.
Here's how:
Load the caulking gun or open the pourable jug.
Push the filler into the crack starting at the lowest point.
Overfill slightly. Filler shrinks as it cures.
Smooth with a trowel or putty knife.
Leave a slight crown. It settles flush as it dries.
Watch Out Never apply filler when rain is forecast within 24 hours. Water hitting uncured filler washes it out of the crack and leaves you back at square one.
Curing Time and Weather Conditions That Affect Your Repair
Curing time depends on temperature, humidity, and filler type, but the reason it matters is simple: filler must lose its carrier liquid and set before water or traffic disturbs it. Most products reach a tack-free state within hours and fully cure in one to three days. Tack-free is not cured; a repair that looks done can still be soft underneath.
Temperature requirements matter more than most people realize:
Above 50°F: ideal for most fillers
50-60°F: slower cure, add extra dry time
Below 50°F: most fillers won't bond properly
Above 90°F: filler skins over too fast to smooth
Why Temperature Controls the Bond
Asphalt emulsion filler cures by losing water or solvent, and that process slows as temperature drops. Below roughly 50°F, the carrier doesn't evaporate fast enough, the filler stays soft, and it never fully adheres to the crack walls. It may look fine for weeks, then pull away at the first hard freeze.
The Freeze-Thaw Problem
In freeze-thaw climates, any water reaching the crack before the filler fully cures will freeze, expand, and push the filler out. Apply when the forecast stays above freezing for at least 48 hours, and never when rain is forecast within 24 hours.
How to Tell If Your Repair Failed Because of Weather
The symptoms point to the cause:
Filler pulled cleanly away from both edges: applied to a damp or dirty crack, or applied below the temperature range.
Filler cracked in a web pattern: applied too hot, so it skinned over and the shell fractured.
Filler bubbled or lifted: moisture trapped underneath, usually from rain during cure or a wet crack.
Filler still soft days later: applied in cool or humid conditions and never fully cured.
How to Fix a Weather-Related Failure
Don't refill over the failed repair. Remove the old filler with a chisel or wire brush, re-clean the crack, and let it dry. If temperature caused the failure, wait for a day inside the product's rated range; if moisture did, confirm the crack is dry to the touch. Refilling over a failed patch guarantees a second failure.
Key Takeaway Weather-related failures are the most common and the most preventable. Check the forecast for a 48-hour dry window inside the filler's temperature range before you open the tube, and you eliminate most of the reasons a DIY repair fails.
When to Call a Professional for Asphalt Repair
Call a professional when damage goes deeper than the surface. Crack filler is a maintenance tool, not a structural fix.
Reach out to a pro if you see:
Alligator cracking across a wide area
Potholes larger than a dinner plate
Cracks wider than an inch
Sinking or soft spots underfoot
Repeated failures in the same spot
Key Takeaway If a crack comes back in the same spot within a year, the problem isn't the filler. It's the pavement underneath, and it needs a professional assessment before you waste money on another tube.
Troubleshooting Failed Repairs and Preventing Future Asphalt Driveway Cracks
Failed repairs almost always trace to one of four causes: poor prep, wrong filler, bad weather, or a deeper structural problem. Diagnose which applies before trying again.
Problem | Likely Cause | Fix |
Filler pulled away from edges | Dirty or damp crack | Re-clean, let dry, refill |
Repair sank within weeks | Underfilled crack | Top off with fresh filler |
Cracks returned in months | Failing sub-base | Call a pro for assessment |
Filler cracked and crumbled | Applied in cold weather | Wait for 50°F+ and redo |
Sealcoat every 2-3 years to protect the surface
Clear debris from cracks before winter
Keep water draining away from the driveway edges
Fix hairline cracks early before they widen
Best For Homeowners with hairline or single cracks under half an inch who want a weekend project. Larger damage, alligator cracking, or potholes need professional asphalt repair.
Frequently Asked Questions
What is best to fill cracks in an asphalt driveway?
For most residential driveway cracks, a rubberized asphalt-emulsion filler works best because it flexes with temperature changes and resists cracking. For cracks wider than half an inch, use a pourable filler and add backer rod first to reduce how much product you need. Hairline cracks under an eighth of an inch often call for a liquid crack sealer instead. The right choice depends on crack width, depth, and whether the damage is a simple fissure or alligator cracking.
How do you prepare asphalt cracks before filling them?
Preparation decides whether the repair lasts. Start by removing loose debris, dirt, and vegetation with a wire brush, chisel, or screwdriver. Then use a pressure washer or compressed air to blow out remaining dust. If the crack edges are crumbly, square up the edges with a chisel so the filler has a clean surface to bond to. Let the crack dry completely before applying filler, since moisture prevents adhesion.
How long should you wait before driving on repaired asphalt cracks?
Curing time depends on the filler type and weather. Most cold-pour rubberized fillers are tack-free within a few hours, but full curing can take 24 to 48 hours. Pourable fillers used on larger cracks may need up to 24 hours before vehicle traffic. In cooler temperatures or high humidity, wait longer. If the surface still feels sticky or soft, give it more time before driving on it.
When is the best time of year to repair asphalt driveway cracks?
Late spring through early fall works best in most climates because asphalt needs consistent temperatures above 50°F for proper adhesion and curing. In colder regions, schedule repairs after the last freeze and before the first fall frost. Summer heat can make fillers too soft to work with, so early morning is often ideal. Repairing before winter prevents water from seeping into cracks and expanding during freeze-thaw cycles.
GET A FREE ESTIMATE


Comments